
Google Bigquery using Tableau Prep
Step 1: Create a Published Data Source
- Click the plus icon on a step and select Add Output.
- The output pane opens and shows you a snapshot of your data.
- From the Save output to drop-down list, select the Published data source (Publish as the data source in previous versions).
Complete the following fields:
- Server (Tableau Prep Builder only): Select the server to publish the data source and extract. If you aren’t signed in to a server, you will be prompted to sign in.
Note: Starting in Tableau Prep Builder version 2020.1.4, after you sign in to your server, Tableau Prep Builder remembers your server name and credentials when you close the application. The next time you open the application, you are already signed into your server.
On the Mac, you may be prompted to provide access to your Mac keychain so Tableau Prep Builder can securely use SSL certificates to connect to your Tableau Server or Tableau Online environment. - Project: Select the project where you want to load the data source and extract.
- Name: Enter a file name.
- Description: Enter a description for the data source.
4. (Tableau Prep Builder version 2020.2.1 and later) In the Write Options section, view the default write option to write the new data to your files and make any changes as needed.
- Create table: This option creates a new table or replaces the existing table with the new output.
- Append to the table: This option adds the new data to your existing table. If the table doesn’t already exist, a new table is created, and subsequent runs will add new rows to this table.
5. Click Run Flow to run the flow and publish the data source.
6. (optional) Click on the Custom SQL tab and enter your SQL script. You can enter a script to run Before and After the data is written to the table.
STEP 2: DATA VALIDITY
If there are any field mismatches, a status note shows you errors.
- No match: Field is ignored: Fields exist in the flow but not in the database. The field won’t be added to the database table unless you select the Create table write option and perform a full refresh. Then the flow fields are added to the database table and use the flow output schema.
- No match: Field will contain Null values: Fields exist in the database but not in the flow. The flow passes a Null value to the database table for the field. If the field does exist in the flow but is mismatched because the field name is different, you can navigate to a cleaning step and edit the field name to match the database field name.
- Error: Field data types do not match: The data type assigned to a field in both the flow and the database table you are writing your output must match; otherwise, the flow will fail. You can navigate to a cleaning step and edit the field data type to fix this.
STEP 3: WRITE BACK IMPLEMENTATION
- A common feature that Data Analysts, Data Scientists, and Data Engineers often ask for in a Business Intelligence Reporting tool is the ability to combine data from different databases, especially data spread across two or more database vendors, such as PostgreSQL, MySQL, SQL Server, Bigquery(*Imagine data available in different regions, US and Southeast Asia respectively). This article explores this feasibility and will show you how to achieve the same using the Tableau Prep tool.
STEP 4: CONNECTION INFORMATION
SCHEMA COMPONENTS
When you specify a table schema, you must supply each column’s name and correct data type.
COLUMN NAMES
A column name must contain only letters (a-z, A-Z), numbers (0-9), or underscores (_), and it must start with a letter or underscore. The maximum column name length is 300 characters. A column name cannot use any of the following prefixes:
- _TABLE_
- _FILE_
- _PARTITION
Duplicate column names are not allowed even if the case differs. For example, a column named Column1is considered identical to a column named column1.
Note: The user can specify the database connection and a table name. Please note that the table will be created during writing if it does not exist.
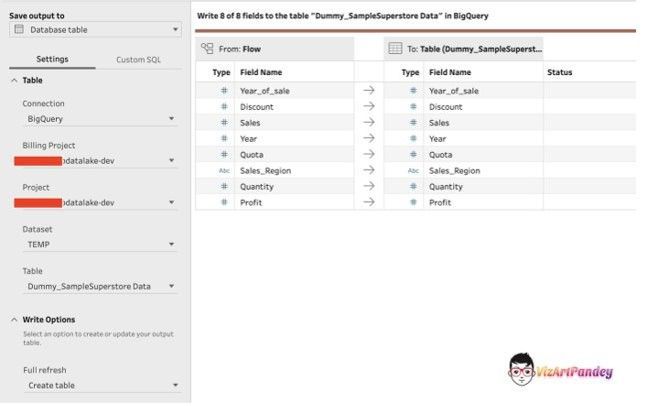
- From the Save output to the drop-down list, a select Database table.
- In the Connection drop-down list, select the database connector where you want to write your flow output.
- In the Billing Project drop-down list, select the Cloud Billing account for your project.
- Select the project where your BigQuery dataset is stored from the Project list. Click on the project id. You should now see a list of all the available datasets.
- Specify the Dataset ID. In this case, for demonstration purpose I am using the “TEMP” Dataset.
- Add a Table Name (no spaces allowed). In the Table drop-down list, select the table where you want to save your flow output data. Depending on the Write Option you select, a new table will be created, the flow data will replace any existing data in the table, or flow data will be added to the existing table.
- Run the ETL Prep Flow.